











Bad kombucha equipment can lead to weak fermentation, mold risk, flat flavor, messy bottling, or unsafe pressure in bottles. Whether you brew kombucha at home or plan commercial production, the right tools help you control taste, safety, fizz, and repeatable quality.
To make kombucha, you need tea, cane sugar, water, a SCOBY, starter tea, a clean glass jar or stainless steel fermentation tank, breathable cover, rubber band, thermometer, pH test strips or meter, strainer, bottles for second fermentation, and cleaning tools. Commercial kombucha brewing also needs sanitary tanks, CIP cleaning, cooling, filtration, carbonation, filling, and quality control equipment.

Executive Summary
Kombucha is a fermented tea made with sweetened tea and a SCOBY, a culture of bacteria and yeast that drives fermentation.
For safe homemade kombucha, pH control matters. Colorado State University notes kombucha should be below pH 4.2 but not below pH 2.5 for safe consumption.
A homebrew setup can start with a glass jar, coffee filter or tea towel, rubber band, starter tea, kombucha SCOBY, thermometer, test strips, and glass bottles.
Second fermentation creates carbonation, but pressure can build in bottles, so bottle choice and monitoring matter.
Commercial kombucha production requires stainless steel fermentation tanks, hygienic design, temperature control, pH/TA testing, safe packaging, and process records.
The best equipment depends on your goal: homemade kombucha, taproom-style batches, beverage co-packing, or scalable factory production.
Article Outline
What is kombucha brewing, and why does equipment matter?
What basic equipment do you need to make kombucha at home?
Why are SCOBY, starter tea, and sweetened tea essential?
What jar, cover, rubber band, and brewing vessel should you use?
What tools help control fermentation, temp, and pH?
What bottles are needed for second fermentation and carbonation?
How do you make kombucha with a simple 1-gallon recipe?
What equipment is needed for commercial kombucha brewing?
What are the trade-offs between DIY kombucha kits and professional systems?
How should beverage businesses choose kombucha equipment?
What Is Kombucha Brewing, and Why Does Equipment Matter?
Kombucha brewing is the process of fermenting sweetened tea with a SCOBY. The word SCOBY means symbiotic culture of bacteria and yeast. During fermentation, yeast and bacteria work together to change sugar and tea into a tart, lightly fizzy fermented tea. Research describes kombucha as sugared tea fermented at ambient temperature with a cellulose pellicle made up of acetic acid bacteria and yeast.
Equipment matters because kombucha is alive. It needs air during the first fermentation, clean tools, the right room temperature, enough starter tea, and a safe vessel. Poor tools can slow the brew, invite fruit flies, increase contamination risk, or create inconsistent flavor. This is true whether you make kombucha at home in a wide-mouth jar or produce it in a commercial beverage facility.
From my experience as a brewery, distillery, winery, kombucha, and beverage equipment manufacturer, I usually tell buyers one thing first: attrezzatura per kombucha should support clean fermentation before it supports high output. A bigger tank is not useful if the process is hard to clean, hard to test, or hard to repeat.
What Basic Equipment Do You Need to Make Kombucha at Home?
To make kombucha at home, you need simple but clean tools. A beginner homebrew setup usually includes a glass jar, tea, organic cane sugar or cane sugar, starter liquid, a kombucha SCOBY, a breathable cover, rubber band, thermometer, pH test strips, strainer, and glass bottles for second fermentation.
A basic homemade kombucha equipment list looks like this:
| Equipment | Why You Need It |
|---|---|
| Glass jar or brewing jar | Holds the sweet tea, starter, and SCOBY |
| SCOBY | Starts the fermentation process |
| Starter tea | Acidifies the brew and protects the batch |
| Tea bags or loose leaf tea | Provides nutrients and flavor |
| Cane sugar | Feeds yeast and bacteria |
| Coffee filter or tea towel | Covers the jar while allowing airflow |
| Rubber band | Secures the cover and keeps fruit flies out |
| Thermometer | Helps monitor room temperature |
| pH test strips or meter | Checks acidity and safety range |
| Strainer | Removes tea leaves or fruit pieces |
| Glass bottles | Used for second fermentation and fizz |
For beginners, this setup is enough to start brewing. A DIY kombucha kit may include many of these items, but you should still check the quality of the jar, bottles, and test strips. Cheap bottles may not handle pressure well during bottle conditioning.
Why Are SCOBY, Starter Tea, and Sweetened Tea Essential?
The SCOBY is the heart of kombucha brewing. It often looks like a pale, rubbery layer called a pellicle. This pellicle forms on the surface as the culture ferments sweet tea. Studies of SCOBY cultures show that kombucha communities commonly include yeast and acetic acid bacteria, with common genera such as Brettanomyces and Komagataeibacter found in many samples.
Starter tea is just as important as the SCOBY. It lowers the pH of the new batch at the start. This makes the brew less friendly to unwanted microbes. Colorado State University explains that acidification helps kombucha reach a safe pH and reduce contamination risk.
Sweetened tea provides food. You can use black tea, green tea, or a blend of black and green tea. The yeast consumes sugar and produces compounds that bacteria convert into organic acids. Without enough sugar, the kombucha may become sluggish. Without enough starter, the batch may not acidify fast enough.
What Jar, Cover, Rubber Band, and Brewing Vessel Should You Use?
For kombucha at home, a wide-mouth glass jar is usually the easiest choice. Glass is easy to see through, easy to clean, and does not react with acidic kombucha. A 1 gallon jar is common for a small batch of kombucha. A half-gallon jar is also useful when testing a new kombucha recipe or different flavors.
You should cover the jar with a coffee filter, tea towel, or tightly woven breathable cloth. The cover should allow oxygen to enter but keep fruit flies, dust, and insects out. A rubber band keeps the cover tight around the jar. Do not seal the first fermentation with an airtight lid because the SCOBY needs oxygen.
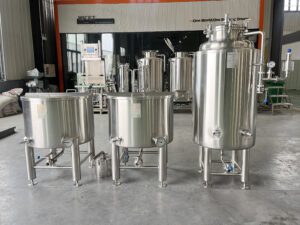
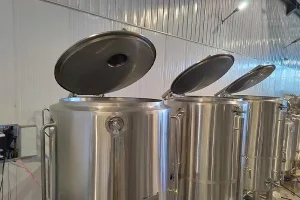
For commercial production, food-grade stainless steel is normally preferred. It is stronger, more hygienic, easier to clean, and better for controlled production. A commercial kombucha tank may include a manway, sanitary valves, CIP spray ball, cooling jacket, sample valve, temperature probe, and optional spigot or racking outlet.
What Tools Help Control Fermentation, Temp, and pH?
Kombucha fermentation depends on temperature, time, acidity, starter strength, and culture health. A simple thermometer helps you check room temperature. Kombucha usually ferments at room-temperature conditions, but very cold rooms can slow the process, while overly warm rooms can push faster acid production.
pH test strips or a pH meter help you monitor acidity. Colorado State University states that safe kombucha should be below pH 4.2 and not lower than pH 2.5. This is why test strips are not just “extra tools.” They help you know whether the brew is moving in the right direction.
For home use, test strips are usually enough. For professional beverage production, a pH meter, titratable acidity testing, alcohol testing, temperature logs, batch records, and sanitation checks become more important. Kombucha that rises above 0.5% ABV may be regulated as an alcoholic beverage in the United States, so commercial producers should test alcohol carefully.
What Bottles Are Needed for Second Fermentation and Carbonation?
After the first fermentation, many brewers move finished kombucha into bottles for second fermentation. This stage adds flavoring and carbonation. Fruit juice, herbs, ginger, berries, citrus, or other flavoring ingredients can create different flavors. The yeast consumes small amounts of sugar and produces carbon dioxide, which creates fizz.
Use strong glass bottles made for pressure, such as flip-top bottles designed for fermented drinks. Do not use weak decorative bottles. Pressure can build during second fermentation. If bottles are too weak, overfilled, or left too long at warm temperature, they may leak or break.
Second fermentation needs careful control. Use clean bottles, leave headspace, do not overdo sugar, and refrigerate when carbonation is ready. For commercial kombucha, carbonation can be controlled more safely with brite tanks, carbonation stones, pressure-rated vessels, and filling systems.
How Do You Make Kombucha With a Simple 1-Gallon Recipe?
A simple 1 gallon kombucha recipe usually starts with brewed tea, sugar, starter tea, and a SCOBY. Exact ratios vary by recipe and culture strength, but the basic process is easy to understand.
A beginner process may look like this:
- Brew tea with tea bags or loose leaf tea.
- Add cane sugar while the tea is hot and stir until dissolved.
- Cool the sweet tea to room temperature.
- Pour it into a clean glass jar.
- Add starter tea and the kombucha scoby.
- Cover the jar with a coffee filter or tea towel.
- Secure it with a rubber band.
- Let it ferment at room temperature.
- Taste after several days.
- Bottle the finished kombucha for flavoring or second fermentation.
- Save starter tea and SCOBY for the next batch.
Colorado State University notes that kombucha is often fermented for 7–10 days, though timing can vary based on conditions and desired taste. A shorter brew may taste sweeter. A longer brew may taste more sour or vinegary. If the batch smells rotten, grows fuzzy mold, or looks unsafe, discard it.
What Equipment Is Needed for Commercial Kombucha Brewing?
Commercial kombucha brewing needs stronger, cleaner, and more controlled equipment than homemade kombucha. A beverage producer needs to repeat the same taste, acidity, carbonation, and package quality across every batch. This requires more than a glass jar.
A commercial kombucha line may include:
| Process Stage | Professional Equipment |
|---|---|
| Tea brewing | Hot water tank, tea extraction vessel, filter or strainer |
| Sugar mixing | Mixing tank, agitator, dosing system |
| Cooling | Plate heat exchanger or jacketed cooling tank |
| Fermentation | Stainless steel fermentation tank with sanitary fittings |
| Culture handling | SCOBY handling tools, starter tank, sanitary transfer |
| Test | pH meter, thermometer, alcohol testing, acidity testing |
| Flavoring | Mixing tank, fruit juice dosing, ingredient filtration |
| Carbonation | Brite tank, carbonation stone, CO₂ control |
| Filtration | Strainer, membrane filter, or product-specific filtration |
| Packaging | Bottle filler, canning line, keg filler, labeling machine |
| Cleaning | CIP pump, CIP tank, spray balls, sanitary valves |
For a startup kombucha brand, not every item must be fully automatic on day one. But the equipment should be hygienic, scalable, and easy to clean. A poor layout can waste labor every day. A good layout supports smooth movement from tea brewing to fermentation, flavoring, carbonation, and filling.
What Are the Trade-Offs Between DIY Kombucha Kits and Professional Systems?
A DIY kombucha kit is good for learning. It is affordable, small, and easy to use. You can test black tea, green tea, fruit juice, loose leaf tea, and different flavors without much investment. But a DIY kit does not offer strong process control or commercial capacity.
Professional kombucha systems cost more, but they provide better sanitation, repeatability, temperature control, and production planning. They also reduce manual handling. For beverage co-packers, kombucha producers, brewpub chains, and project investors, these benefits can reduce long-term risk.
| Option | Advantage | Limitation |
|---|---|---|
| DIY kombucha kit | Low cost, easy to start | Small volume, less control |
| Glass jar homebrew | Simple and visible | Not scalable |
| Small stainless tank | More durable, cleaner | Higher upfront cost |
| Jacketed fermenter | Better temp control | Needs utilities |
| Full commercial line | Scalable and efficient | Requires planning and capital |
The right choice depends on your goal. If you only want homemade kombucha, use simple tools. If you want a beverage business, plan for hygiene, testing, filling, cooling, and repeatable production.
How Should Beverage Businesses Choose Kombucha Equipment?
B2B buyers should not choose kombucha equipment only by tank volume. Start with the business model. Will you sell fresh kombucha on tap, bottled kombucha, canned kombucha, flavored kombucha, hard kombucha, or co-packed products for other brands? Each model needs different equipment.
A practical buyer checklist:
| Question | Why It Matters |
|---|---|
| What is the target batch size? | Defines tank volume and production plan |
| How many SKUs or flavors? | Affects flavoring tanks and scheduling |
| Do you need carbonation? | Requires pressure-rated equipment |
| Bottle, can, keg, or bulk pack? | Defines filling and packaging line |
| What is the target pH and acidity? | Defines testing and quality control |
| Do you need alcohol control? | Important for compliance and labeling |
| How will tanks be cleaned? | Determines CIP design |
| Is expansion planned? | Affects layout and utility sizing |
| What is the building layout? | Impacts workflow and installation |
| What technical support is needed? | Reduces startup and commissioning risk |
As a professional brewery, distillery, winery, kombucha, and beverage equipment manufacturer, we often review the buyer’s process before recommending tanks. For global projects, we may support factory-direct supply, CAD/3D layout planning, sanitary stainless steel equipment, installation guidance, and long-term technical service.
What Recommendations Do Not Apply to Every Kombucha Project?
Not every kombucha project needs the same equipment. A home brewer does not need a stainless steel CIP system. A small taproom may not need a high-speed canning line. A large beverage co-packer should not rely on open jars or manual bottling.
Some trade-offs are important:
- Glass jars are good for learning, but not for scalable commercial output.
- Open fermentation can support oxygen exposure, but it must be protected from insects and contamination.
- Second fermentation can make kombucha fizzy, but pressure risk must be managed.
- More automation saves labor, but it increases upfront investment.
- Filtration improves clarity, but it may change live culture profile.
- Forced carbonation improves consistency, but it changes the craft-style bottle conditioning approach.
Professional advice should always match the real process, local rules, and market plan. Kombucha for a restaurant chain, kombucha for retail shelves, and kombucha for a small tasting room are different projects.
Practical Case Study: From Homemade Kombucha to Small Commercial Production
A startup beverage team came to us after making successful homemade kombucha in glass jars. Their flavor was good, but they had three problems: inconsistent acidity, slow bottling, and limited batch volume. They wanted to scale without losing the fresh fermented tea character.
We suggested a staged equipment plan:
| Problem | Equipment-Based Improvement |
|---|---|
| Inconsistent pH | Add pH meter, batch records, controlled starter ratio |
| Small batch size | Move from jars to stainless steel fermentation tanks |
| Slow bottling | Use semi-automatic bottle filling |
| Messy flavoring | Add small mixing tank for fruit juice and flavoring |
| Unclear layout | Create CAD/3D flow from tea brewing to packaging |
| Cleaning risk | Add sanitary valves and CIP-ready tank design |
The result was a more reliable kombucha brewing process. The team could still make your own kombucha-style product, but with better hygiene, clearer workflow, and stronger commercial control.
FAQs About Kombucha Equipment
What equipment do I need to make kombucha at home?
You need a glass jar, SCOBY, starter tea, sweetened tea, breathable cover, rubber band, thermometer, pH test strips, strainer, and glass bottles for second fermentation.
Can I brew kombucha without a SCOBY?
You usually need a kombucha SCOBY or strong starter from a previous batch. Store-bought kombucha may work only if it is raw, unflavored, and contains live culture, but results can be slower or less reliable.
What kind of jar is best for kombucha?
A wide-mouth glass jar is best for home kombucha. It is easy to clean, easy to cover, and does not react with acidic fermented tea.
Do I need pH test strips for homemade kombucha?
They are strongly recommended. pH strips or a pH meter help you check whether the fermentation is becoming acidic enough and not becoming too acidic.
What bottles are best for second fermentation?
Use strong pressure-rated glass bottles, such as flip-top bottles designed for fermented drinks. Avoid weak bottles because carbonation can build pressure.
What equipment is needed for commercial kombucha brewing?
Commercial kombucha production may need stainless steel fermentation tanks, tea brewing tanks, mixing tanks, cooling, pH and alcohol testing, carbonation equipment, filtration, filling machines, CIP cleaning, and sanitary piping.
How long does kombucha fermentation take?
Many home batches ferment around 7–10 days, but time depends on temperature, starter strength, sugar, tea, SCOBY health, and preferred taste.
Key Takeaways
To make kombucha, you need tea, sugar, water, SCOBY, starter tea, a clean jar or tank, breathable cover, testing tools, and bottles.
The SCOBY and starter tea are essential for stable fermentation.
A glass jar works well for homemade kombucha, while stainless steel tanks are better for commercial brewing.
pH control is important because kombucha must become acidic enough to reduce contamination risk.
Second fermentation creates fizz, but bottle pressure must be managed carefully.
A DIY kombucha kit is good for learning, but commercial projects need hygienic, scalable equipment.
Beverage businesses should plan equipment around batch size, flavoring, carbonation, packaging, cleaning, and compliance.
Good kombucha equipment should make the process cleaner, safer, easier to repeat, and easier to scale.
For startup kombucha brands, brewpubs, beverage co-packers, wineries, distilleries, and project investors, a professional equipment review can help match the process, layout, and budget before purchasing.